Web Chat
The Web Chat message source type enables you to create a local and publicly accessible web chat form. Each web chat form has a unique secure public URL hosted on Azure as part of the ThinkAutomation Web API and a local URL served directly from your ThinkAutomation Server. You can link to, or embed the public web chat form inside your own website or send a link to the form in outgoing emails. When a web user sends a chat message, the results are sent to your ThinkAutomation Server for immediate processing and the Automation Return Value is returned to the chat. The user can continue sending messages and receiving responses in a conversation-style UI. Any number of separate Web Chat Form message sources can be created.
Bot Name
Specify the name for your 'bot'. When ThinkAutomation sends back a response the Bot Name shows above the response text in the chat. You can use an email address in the form Bot Name <email>. The bot name shown in the chat form will just be the name part. The Bot Name is also used for the 'To' address of messages sent from the Web Chat form to your ThinkAutomation server and available in your Automation in the %Msg_To% variable.
Start Chat
Before a user starts a chat session you can optionally require that the user enters their Name, Email Address and/or a Subject. These values will be passed to your Automation with each chat message in the %Msg_FromName%, %Msg_FromEmail% and %Msg_Subject% variables.
You can configure the input fields for Name, Email & Subject (such as Prompt text, Required etc.). For the Subject field, if you want to provide a list of possible values instead of free-text, set the Attributes of the Field to Validate - Must Be In List - and then provide the Choices.
You can also pre-populate the Name, Email & Subject field values via the chat form URL. Adding &x-Name=value , x-Email=value and x-Subject=value to the chat form URL will set the values on form load.
You can change the Start Chat Header text. This is any text that appears above the Start Chat input fields. You can also change the Start Chat Button Text.
Send Token On Chat Start
If this option is enabled then your Automation will receive a message with the %Msg_Body% set to [webchatstart] after a user has completed the Start Chat form to initiate a new chat session. Your Automation could check for this token and return details about what your bot can offer and any other opening remarks. You can also use this to record user details in a database etc. Your Automation should return blank Return Value if you do not want any response returned to the chat after receiving this message.
Initial Message
After the user completes the Start Chat form and starts a new chat session an Initial Message can be added to the chat. This would normally be a Welcome! How can we help you today? style message. You can use Markdown or HTML if required. Set to blank for no initial message.
File Upload
Enable the Allow File Upload option if you want to allow the user to upload files during the chat. The uploaded file will be added as an attachment to the incoming message. The Allowed File Extensions entry allows you to specify the allowed file types. Specify a comma separated list of allowed file extensions (eg: pdf,doc,docx). You can also specify the Maximum File Size in bytes.
Labels
You can change the Header text and the Message Text Placeholder. The header is displayed above the chat form.
Footer
The footer text defaults to 'Processed By ThinkAutomation'. If you have the ThinkAutomation Professional Edition you can change the Footer text. Set this to blank to remove the footer. The footer can contain HTML.
Theme
Specify a Light, Dark or one of the color themes. You can also optionally specify a Header Image URL. This is the URL to a image that will show in the chat header. This should be a small image (32/32 pixels).
Click the Preview button to display a local preview of how the chat form will look.
Note: Parker Software Professional Services can create bespoke web chat forms with custom styling. Please contact us for more information.
Allowed Origins
Specify the website URLs that are permitted to embed and submit this web chat form. These domains will be used to validate the Origin header of incoming chat message submissions, and will also be applied to the Content-Security-Policy (frame-ancestors) header to control which sites may host the form in an iframe. Leave this field blank if you want to allow the form to be embedded and submitted from any domain.
Enter full URLs (e.g., https://www.example.com). Multiple entries may be separated by commas.
If the Reject If Origin Header Is Blank option is enabled, form submissions will be rejected when no Origin header is present. This is an additional security control to prevent automated or same-site submissions that do not supply origin information.
Public Chat URL
This entry shows the unique public URL for the web chat form. You can link to this from your website, send it in outgoing emails or embed it into your web site pages using an iframe tag. Click the Disable button to disable access from the public URL.
Local Chat URL
This entry shows the unique local URL for the web chat form. This URL connects directly to your ThinkAutomation Server and can be used on your local network. The local web form looks and operates the same as the Public web chat form except that the form contents are posted directly to your ThinkAutomation Server - bypassing the Public API.
Friendly Path
By default the URL path for the web chat form will be /form followed by ?taid={uniquekey}. You can change this to a more friendly path, such as /mycompany/customers/chat. The path must be unique. ThinkAutomation will check that the path is valid and unique before saving.
How it Works
When you save the Message Source your ThinkAutomation Server uploads the chat form details to the ThinkAutomation Web API Gateway server. The Web API Gateway acts as a secure tunnel between the public web form and your on-premises ThinkAutomation instance. Your ThinkAutomation server makes an outbound connection to the Web API Gateway server. Once saved, the web chat form can be used immediately. Any changes you make will be updated.
When a web user sends a chat message, the ThinkAutomation Web API sends a new message to your ThinkAutomation Server. Your Automation will execute for each chat message received. The message body %Msg_Body% variable will contain the user entered message text.
Returning The Automation Return Value
Web Chat forms will automatically wait for your Automation to execute. The Automation Return Value will be displayed in the chat as a response to the message received. You should configure your Automation to return the text, markdown or HTML you want displayed in the chat in response to the message received.
You can also include a redirect in the Return Value if you want the chat session to end and be redirected to another Web Form, Chat Form or URL. See the Create Web Form Redirect action.
Sending '[end]' as the Automation Return Value will end the current chat session for the user.
Sending Chat Input Request Forms
In addition to returning text in the Automation Return Value, you can send 'Chat Input Request' forms. This is a pre-defined list of buttons or inputs that the user can complete to send back specific information.
For example, you could ask the user 'Which product do you use?' and then include buttons for each of your products. The user can simply click one of the buttons instead of typing the product name. See: Create Chat Input Request action.
Integrating With AI
The Automation executed when a chat message is received can perform any actions you choose. You could return on-premises or company data based on the message text received. You can also call an AI (ChatGPT, Azure OpenAI, Grok, Gemini, Claude or OptimaGPT) using the Ask AI action. Using the Ask AI action enables you to very quickly create chat bots - especially when combined with the Embedded Knowledge Store or Embedded Vector Database actions to provide dynamic context using RAG (Retrieval-Augmented Generation). See Approaches To AI RAG.
You can also create multiple AI Connector message sources within the same solution allowing the AI itself to request context when it needs it (currently for OpenAI or OptimaGPT providers only).
A simple AI enabled Chat Bot Automation example:
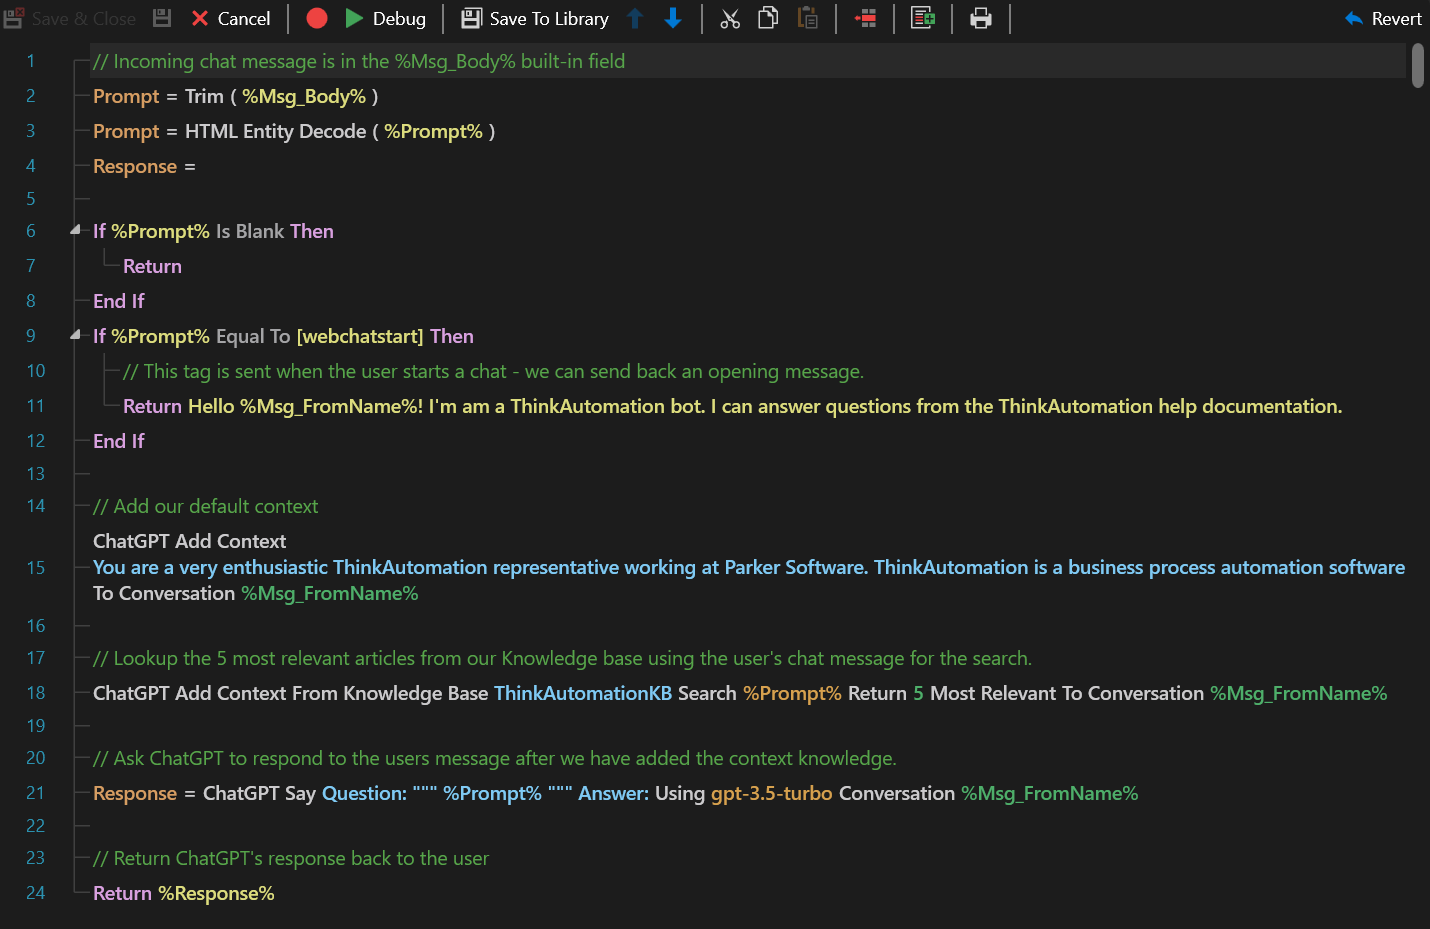
In this example, we have loaded all of the ThinkAutomation help documentation into the Embedded Knowledge Store collection called 'ThinkAutomationKB'. When a user asks a question in the chat, the Automation searches the Knowledge Base using the user's question to find the 5 most relevant articles. Those are then added to the conversation as context. This enables the AI to answer the question - even if it has no knowledge itself.
When you create a new Web Chat Message Source, the New Message Source wizard will ask you if you want to use AI with a Knowledge Store. If this option is enabled, a new Automation will be automatically created and your bot will be ready. You can then edit the Automation if you need to make adjustments.
The integration of ThinkAutomation with AI offers a powerful workflow automation solution that enhances the capabilities of AI through on-premises operation and context enrichment from local knowledge. This approach enables accurate, context-aware responses without the need for model training, ensuring cost-effectiveness and the ability to keep private data secure. It allows organizations to quickly create working bots, maintain up-to-date information, and harness the full potential of AI while maintaining control over their data and data privacy.
For more examples see: Creating An AI Powered Chat Bot